How-to guide
When using the Bank in a Box application, you will be able to perform different tasks depending on your user role.
There are three user roles available in the application: Admin, Customer, and Guest.
As an Admin user, you can perform administrative tasks, managing user profiles and accounts:
- Create customer profiles.
- Create accounts.
- Change an account status.
- Assign and revoke user roles.
- Issue a loan.
- Approve an overdraft.
- Deposit money to an account.
- Register as a user on Bank in the Box.
- Update a Customer profile.
- Set withdrawal and transfer limits.
As a Customer user, you can perform all tasks related to your daily banking needs:
- Create an intrabank payment.
- Create a recurring payment.
- Register as a user on Bank in the Box.
- Update your profile.
- Set withdrawal and transfer limits.
As a Guest user, you can register as a user on Bank in a Box. However, you will not be able to perform any other tasks unless an Admin user assigns you the role of Customer.
Admin tasks

Create a customer profile

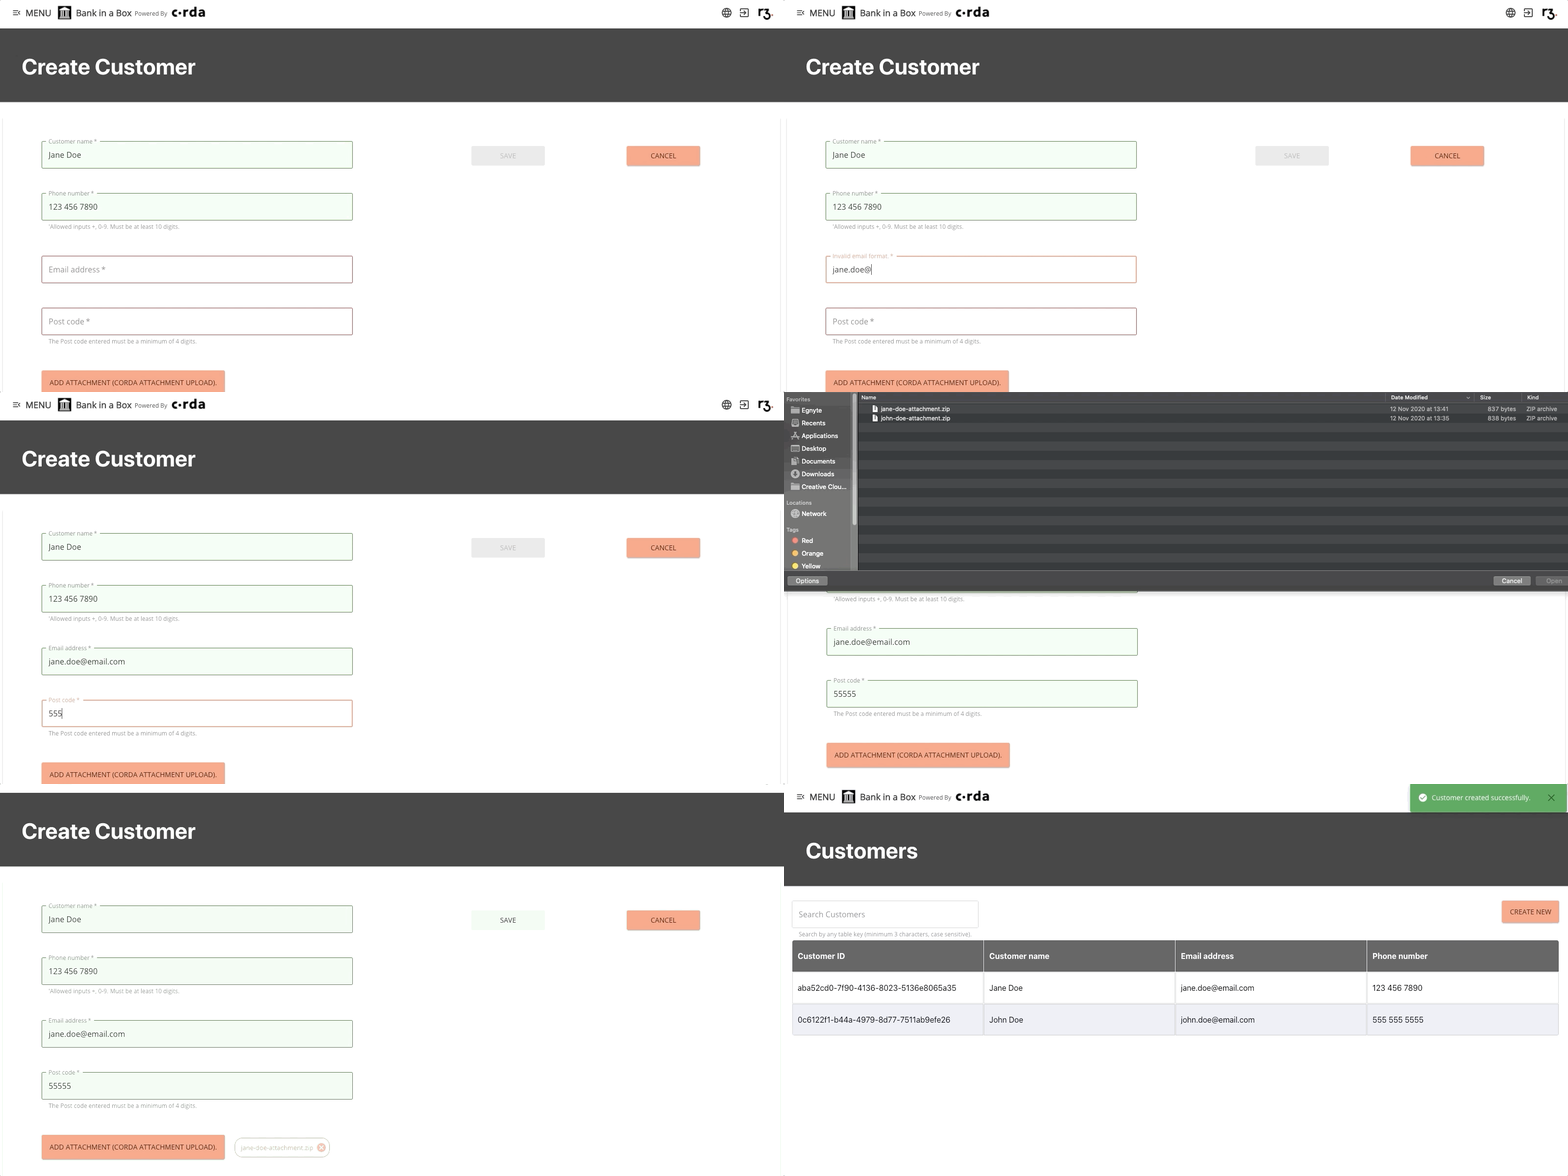
Follow these steps to create a new customer profile.
Navigate to the Customers screen. Click the Create new button in the top right corner.
Fill out all fields:
- Customer name
- Phone number
- Email address
- Post code
Attach supporting documentation (customer document) by clicking the Add attachment button. This attachment mimics a user identity verification and application process. These documents should be contained in a unique jar or zip file.
If the documentation that you upload is already attached to another customer profile, you will receive an error message. Upload a unique jar or zip file with the proper supporting documentation and try again.Once you have entered all details, the Save button will be enabled. Click Save.
You are taken back to the Customers screen and a message will appear indicating that the customer was created successfully.
Create a Current account

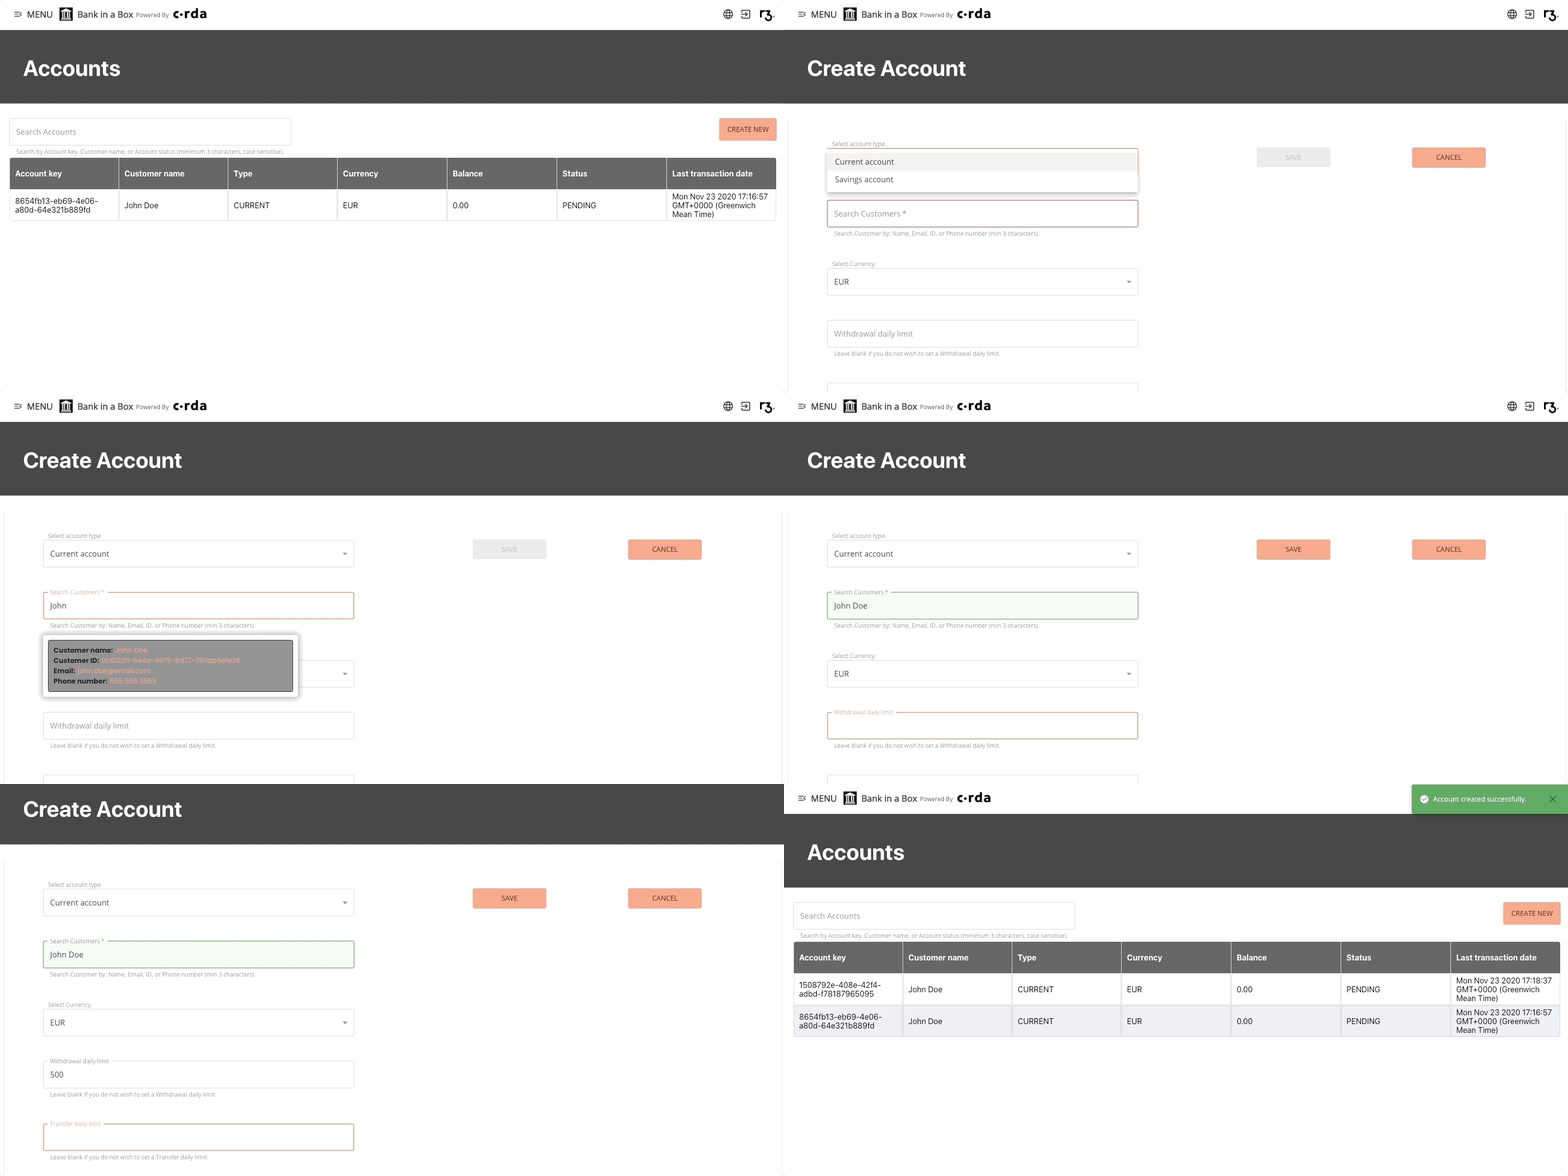
Navigate to the Accounts screen and click Create New in the top right corner of the page.
Select the Account Type: Current Account.
Search for an existing customer by name, email, customer ID, or phone number. The search will begin after you have typed three characters and will update as you add more characters. The search is case sensitive.
A dropdown will appear with your search results. Scroll down until you find the customer profile you are looking for. Click to select the customer.
When you have selected a customer, the search box will turn green and the Save button will be enabled.
The remaining fields are optional but fill them in as necessary. These include:
- Currency - The currency of the account.
- Withdrawal daily limit - The maximum amount that can be withdrawn from the account daily.
- Transfer daily limit - The maximum amount that can be transferred from the account daily.
When you have entered all information necessary for this account, click Save. A message will appear indicating that the account has been created successfully.
When an account is created, it is in PENDING status. This must be changed to ACTIVE for a customer to be able to interact with and use the account. See Change an account status for more information.
Create a Savings account

Navigate to the Accounts screen and click Create New in the top right corner of the page.
Select the Account Type: Savings Account.
Search for an existing customer by name, email, customer ID, or Phone number. The search will begin after you have typed three characters and will update as you add more characters. The search is case sensitive.
When you have selected a customer, the search box will turn green and a message will appear indicating the number of current accounts found for that customer.
Select the currency of the savings account.
If you plan to make transfer between your Current account and Savings account, note that these should be set to use the same currency.Select the desired current account. All existing current accounts for that customer will be displayed in a dropdown.
Select a start date and time for the savings account.
Enter a savings period (in months) for the savings account.
When you have entered all information, click Save. A message will appear indicating that the account has been created successfully.
When an account is created, it is in PENDING status. This must be changed to ACTIVE for a customer to be able to interact with and use the account. See Change an account status for instructions.
Change an account status

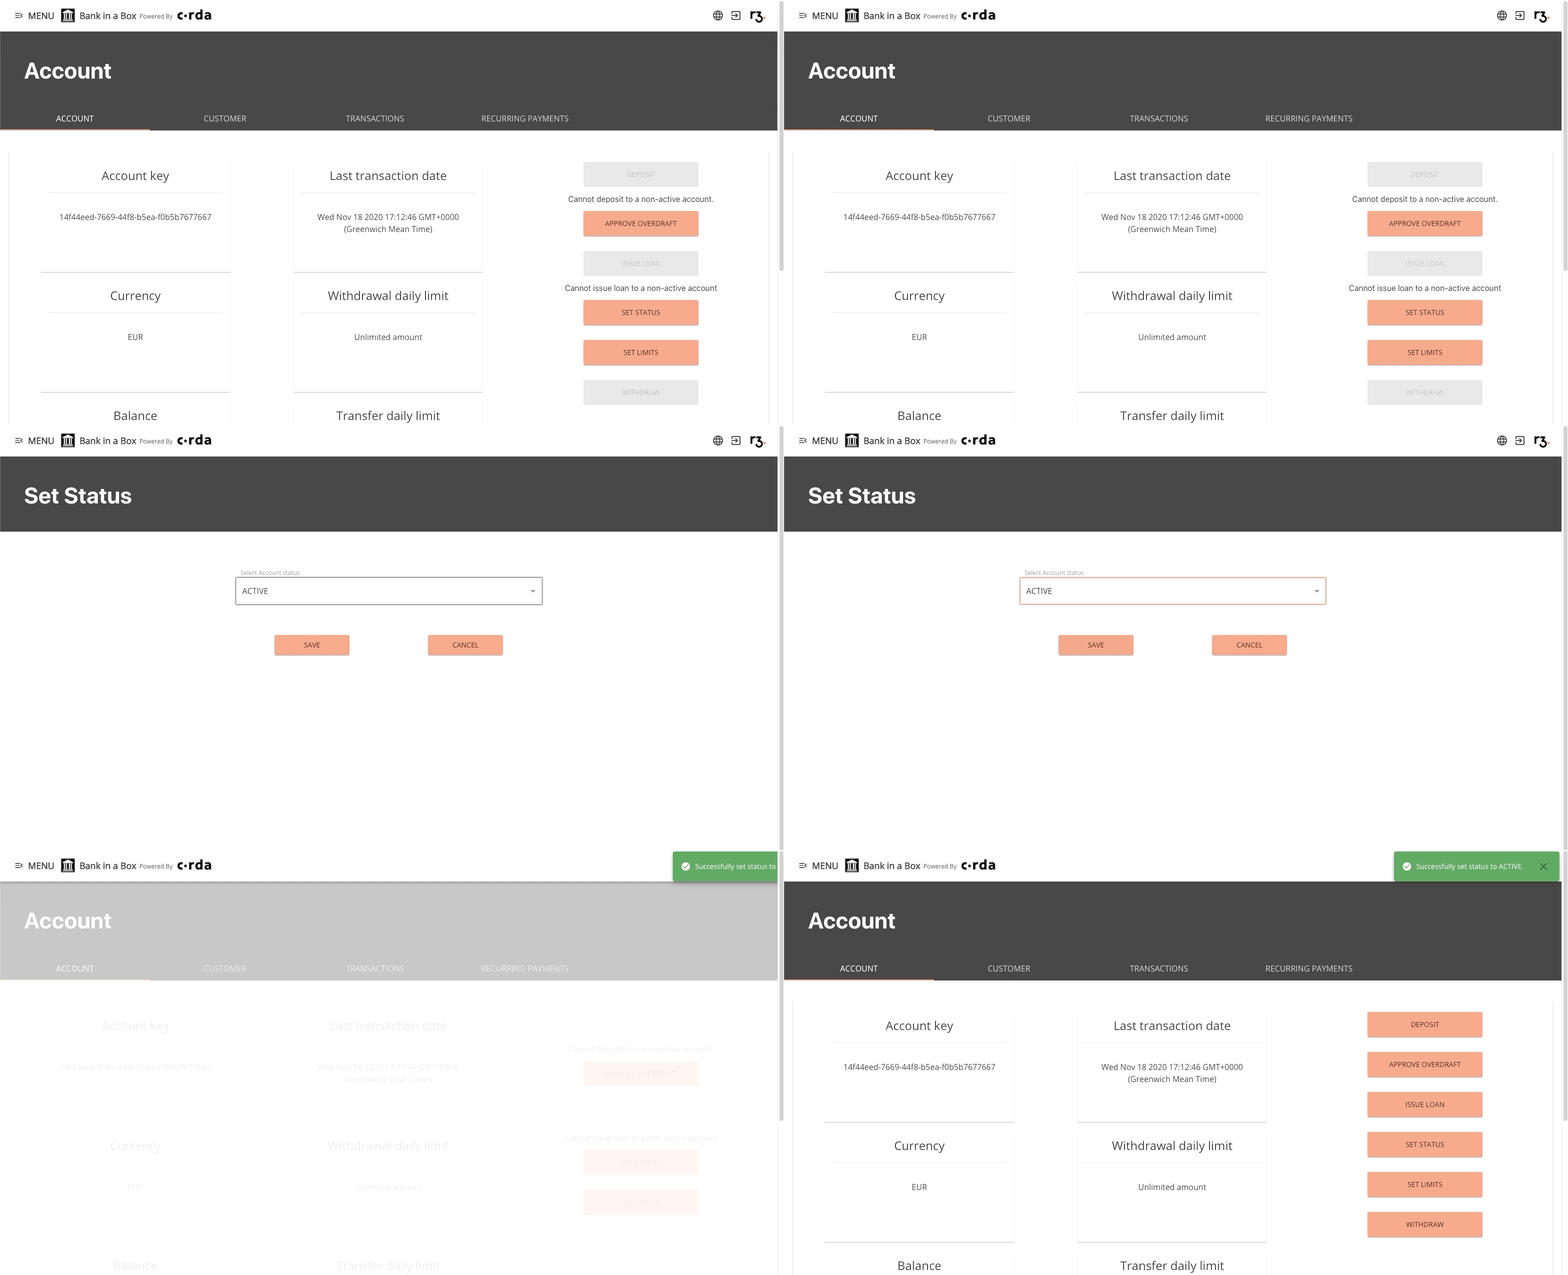
An account has three statuses: PENDING, ACTIVE, and SUSPENDED. When the account is first created, it will be in PENDING status. You must change the status to ACTIVE so that the customer can use their account.
Go to the Account page. Click the Set Status button.
Select ACTIVE and click Save.
You will receive a message indicating that the account has been set to ACTIVE.
If the account needs to be suspended, follow the same steps but select SUSPENDED.
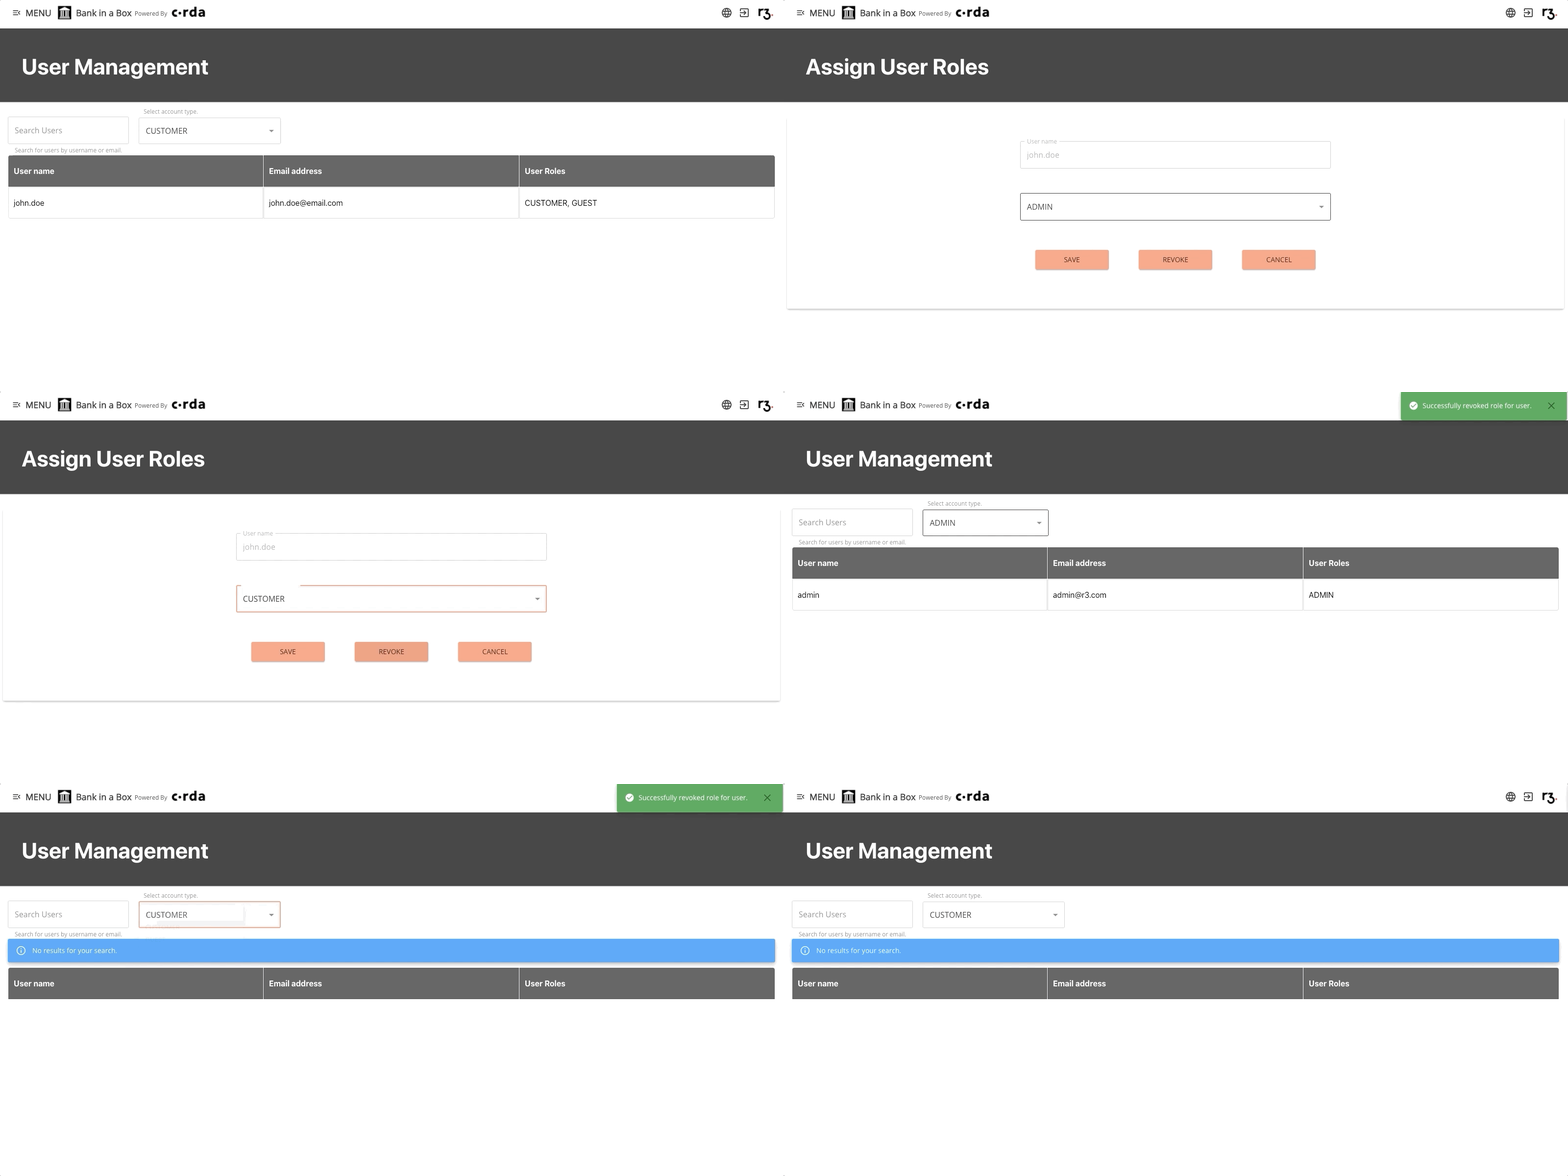
Assign or revoke a user role

Once a customer profile has been created and they have registered as a user on Bank in a Box, an administrator must assign a user role.
GUEST is the default role registered users are given, but they cannot interact with their accounts until they are granted CUSTOMER permissions.
Assign a user role

To assign a user role, follow these steps:
Navigate to the User management page.
Select the GUEST Account type from the dropdown menu. You will see all users registered as GUEST.
Select the user whose role you would like to change.
Set the role to CUSTOMER for bank customers. Set to ADMIN for anyone needing administrator permissions.
Click Revoke. A message will appear indicating that the user role was assigned successfully.
Revoke a user role

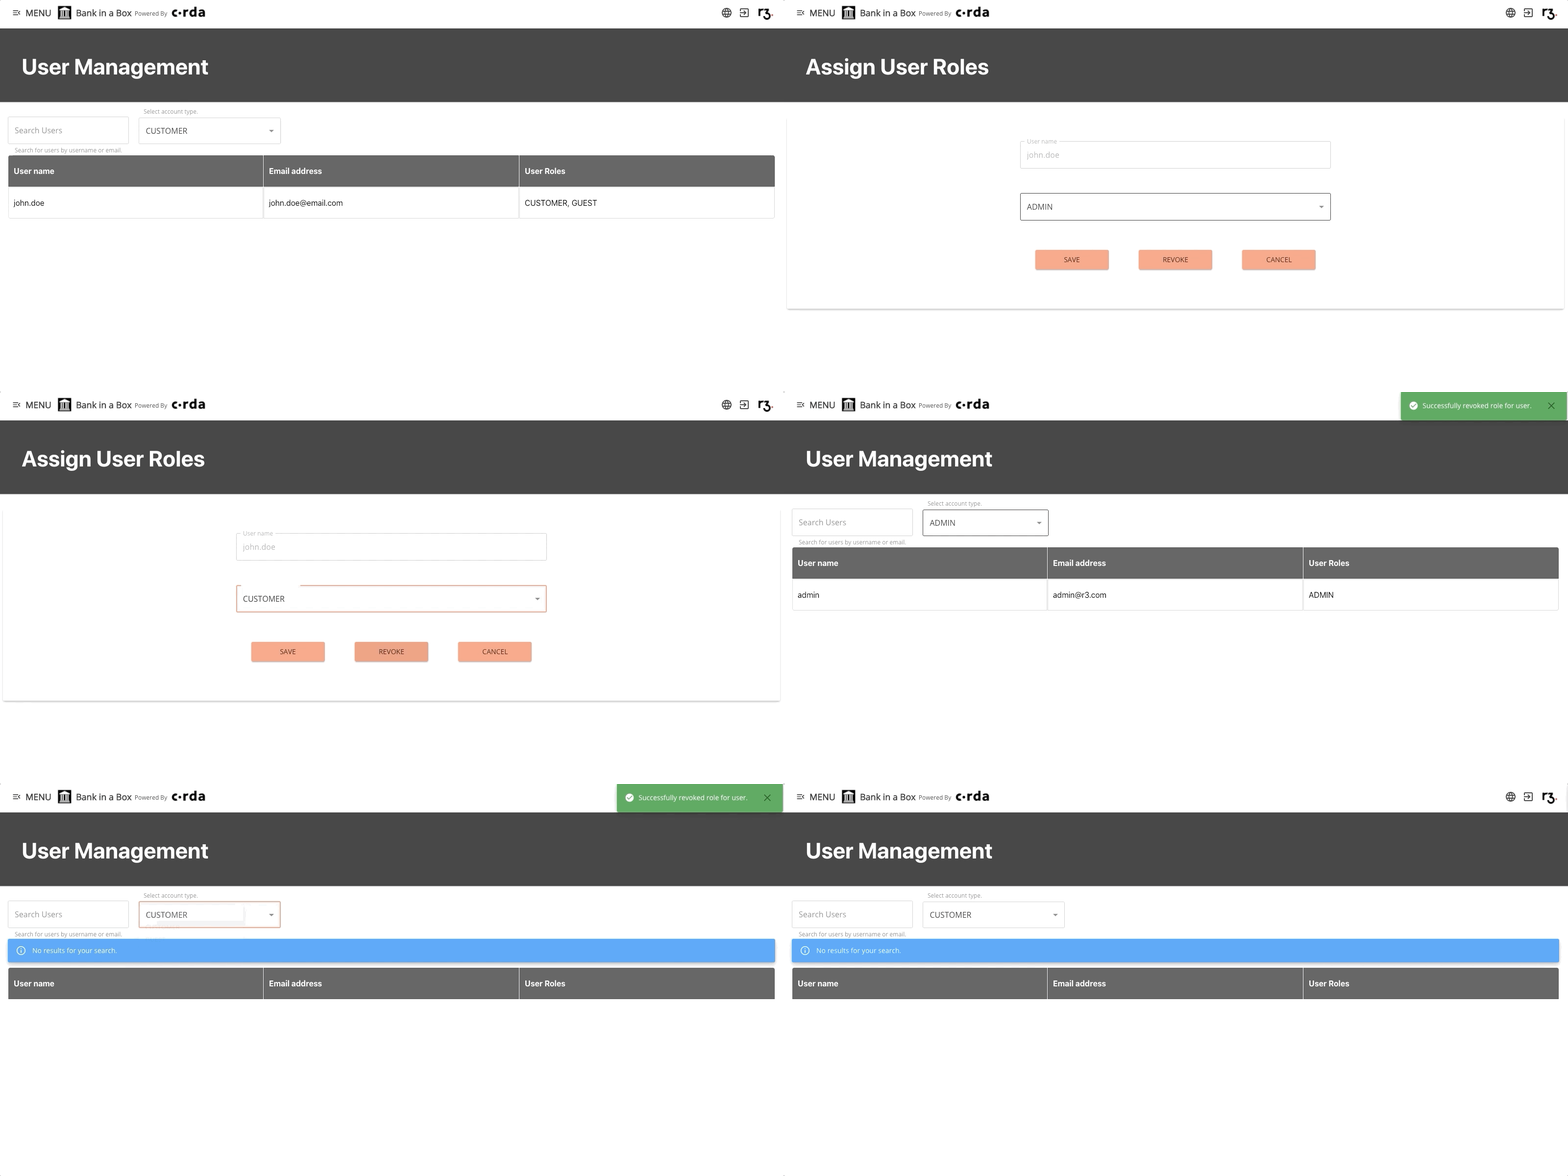
To revoke a user role, follow these steps:
Navigate to the User management page.
Select the Account type of the user whose role you wish to revoke.
Select the user whose role you would like to change.
Select the role you wish to revoke from the user.
Click Save. A message will appear indicating that the user role was revoked successfully.
Issue a loan

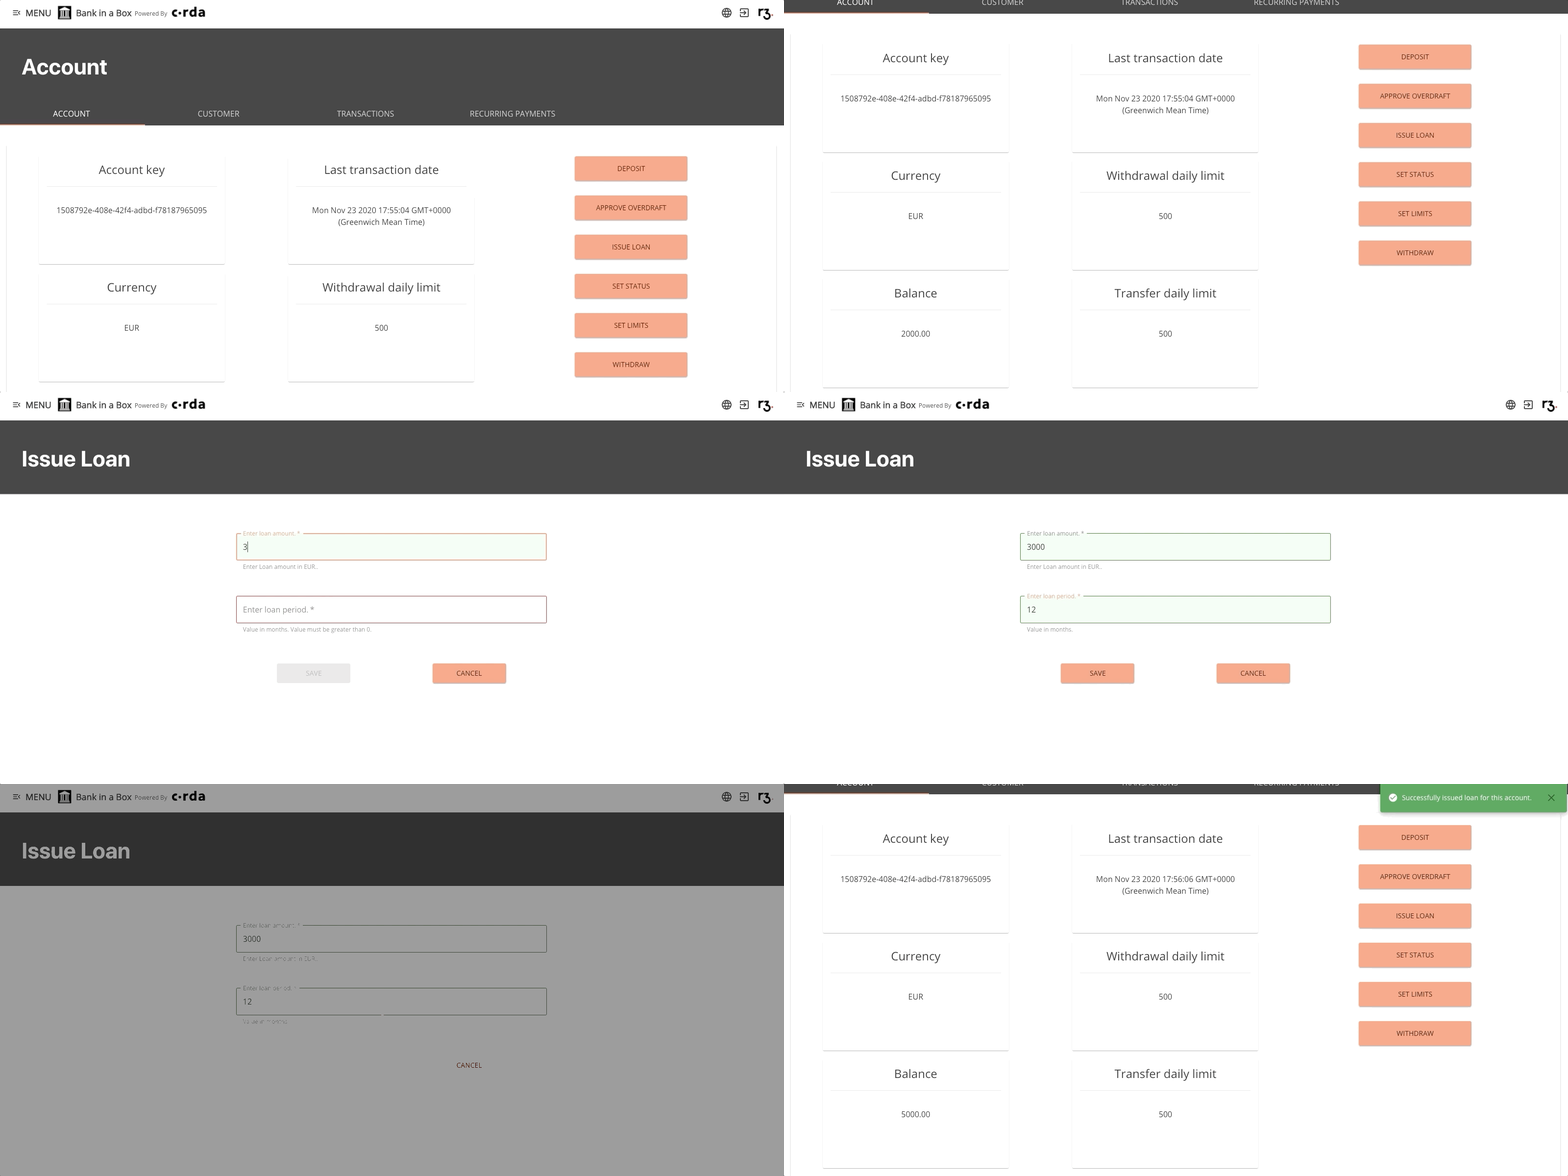
Once the account has been set to ACTIVE, you will have the ability to issue a loan. You can see that the Issue Loan button has now been enabled.
Go to the Account page. Click Issue Loan.
Enter the loan amount.
Enter the loan period in months.
Click Save. You will receive a message indicating that the loan has been issued successfully. You will now see the loan amount reflected in the Balance on the Account page.
A loan account is created when a loan has been issued successfully.
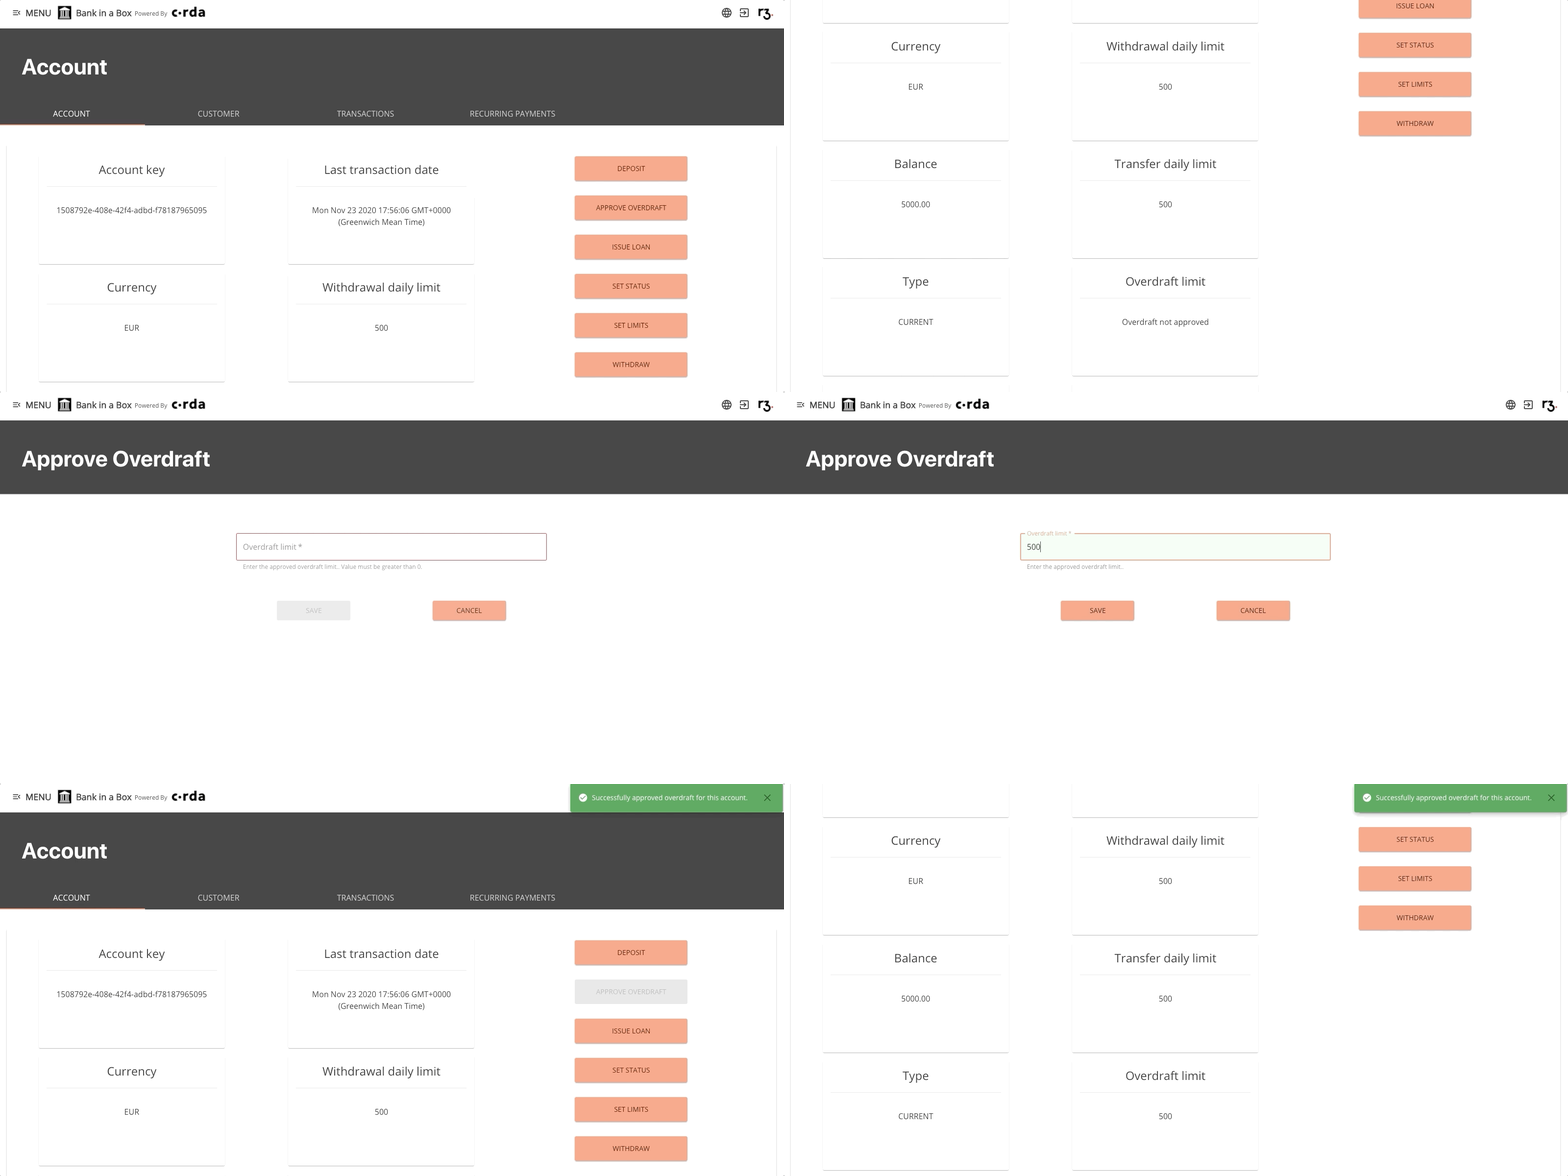
Approve overdrafts

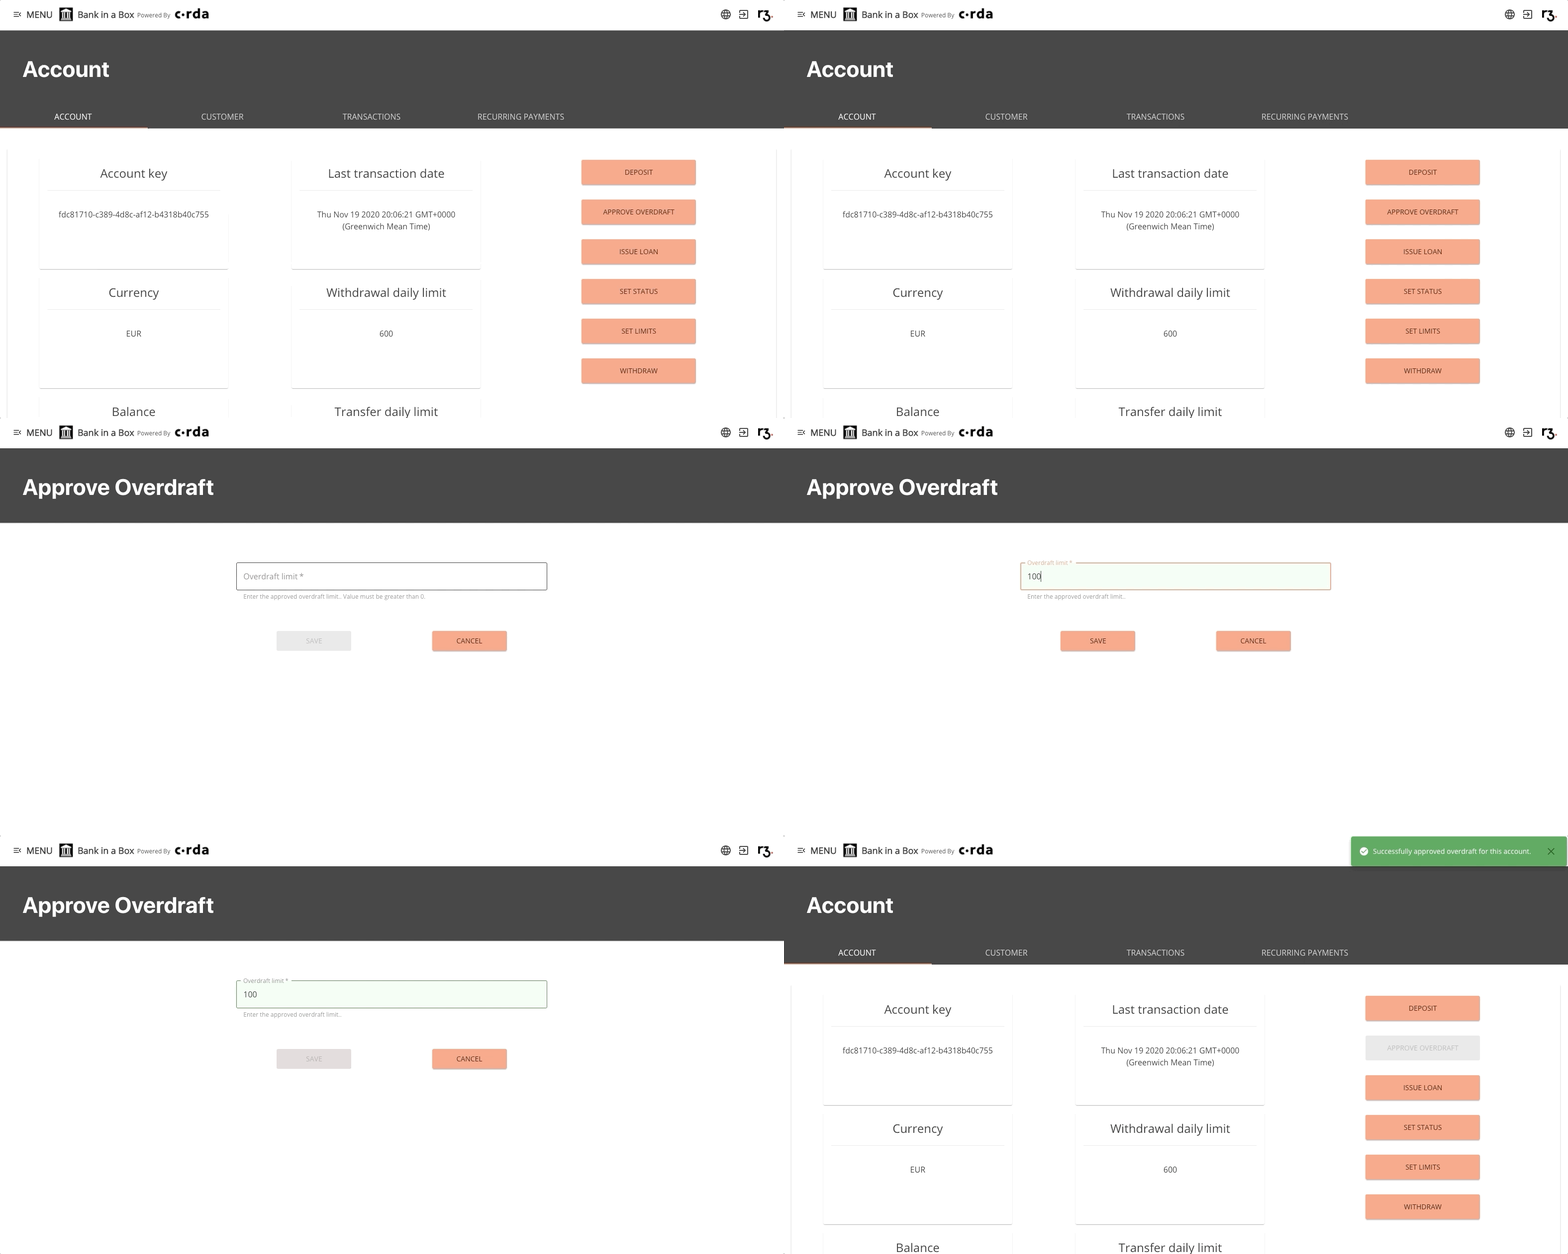
You may wish to approve an overdraft amount for an account. This overdraft represents an extension of credit from the bank that is granted when a customer attempts to withdraw or transfer an amount higher than the amount they have in the account.
For example, a customer has $50 in their savings account. They have an approved overdraft limit of $20. The customer transfers $60 to pay a bill. The transfer goes through successfully and the customer has $10 remaining in their overdraft account.
To approve an overdraft, follow these steps.
Go to the Account page. Click Approve Overdraft.
Enter the amount the customer will be able to overdraw.
Click Save. A message will appear indicating that the overdraft has been successfully approved.
Deposit money to an account

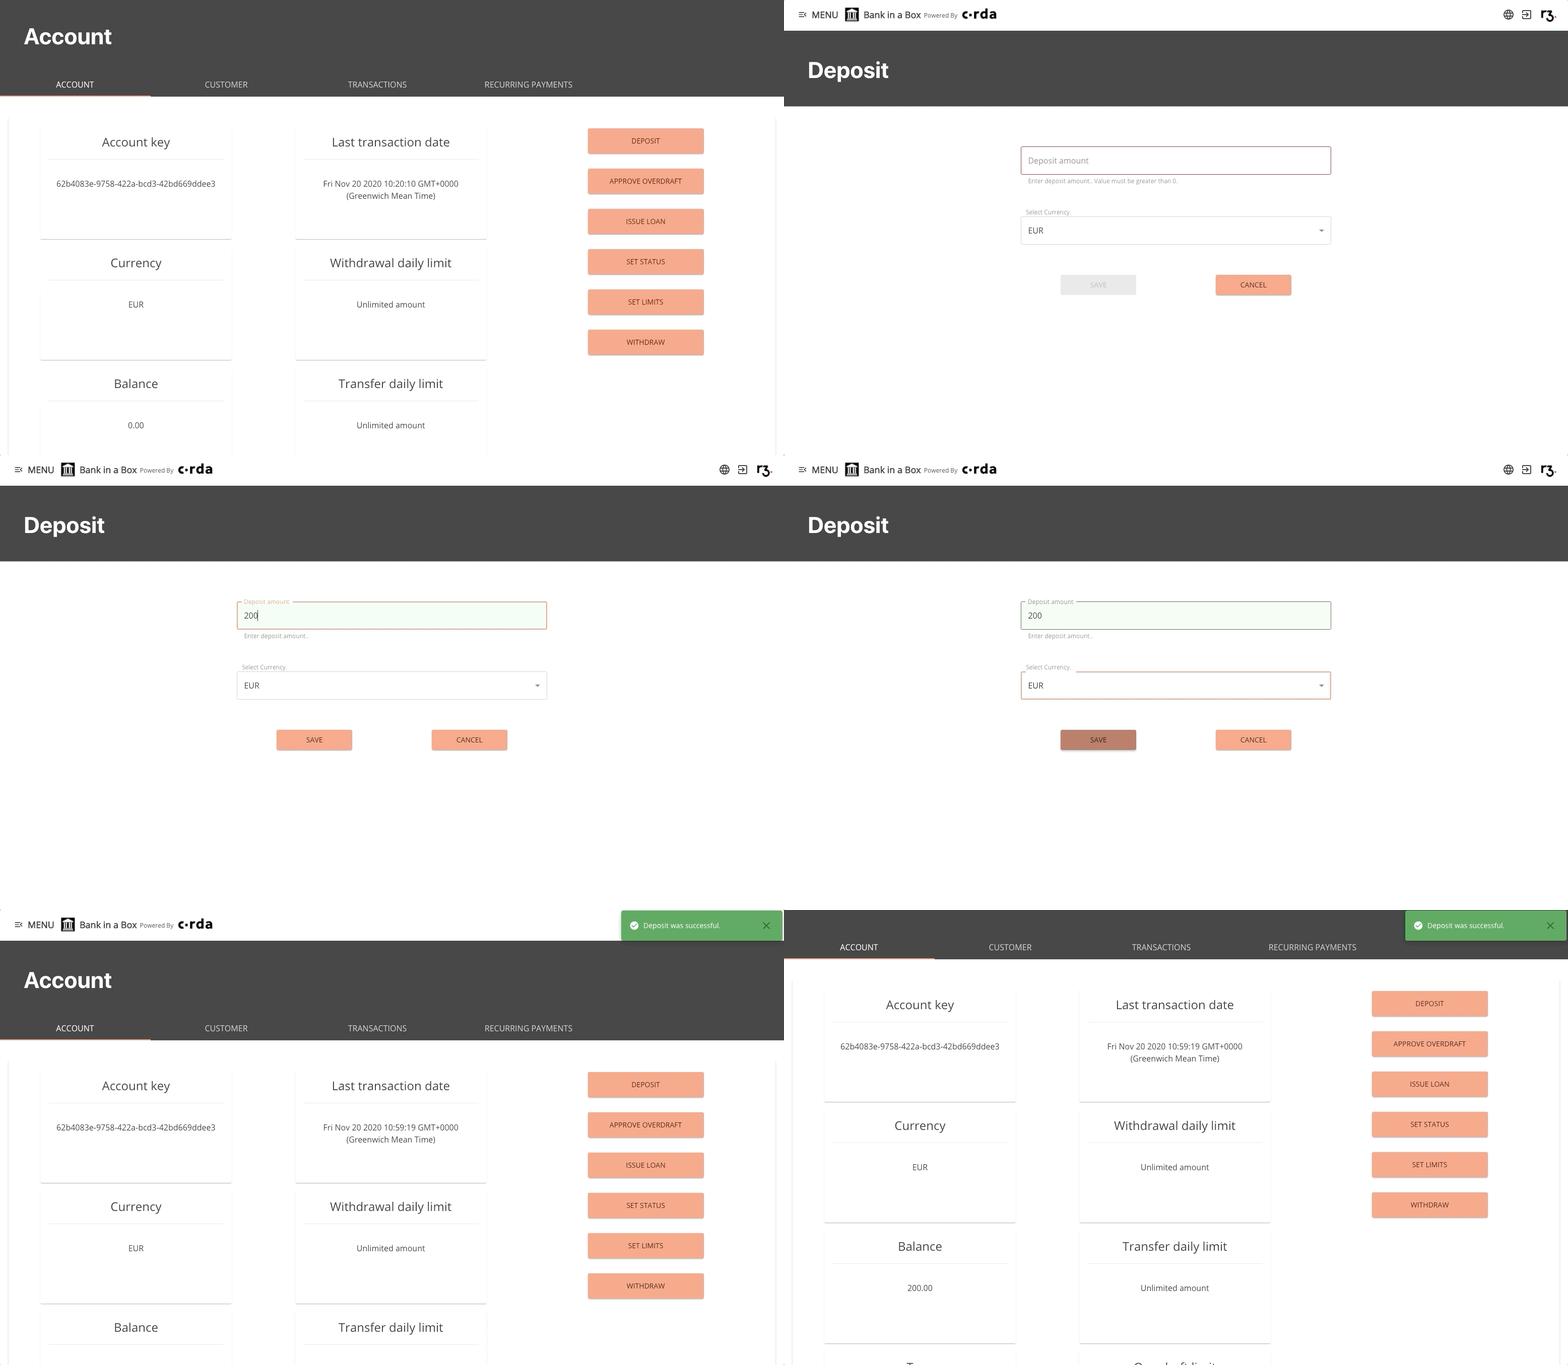
Follow these steps to deposit money to a customer account.
Go to the Account page. Click Depost.
Enter the amount of money you wish to deposit.
Select the currency of the deposit you are making.
Click Save. You will receive a message indicating that the deposit was successful.
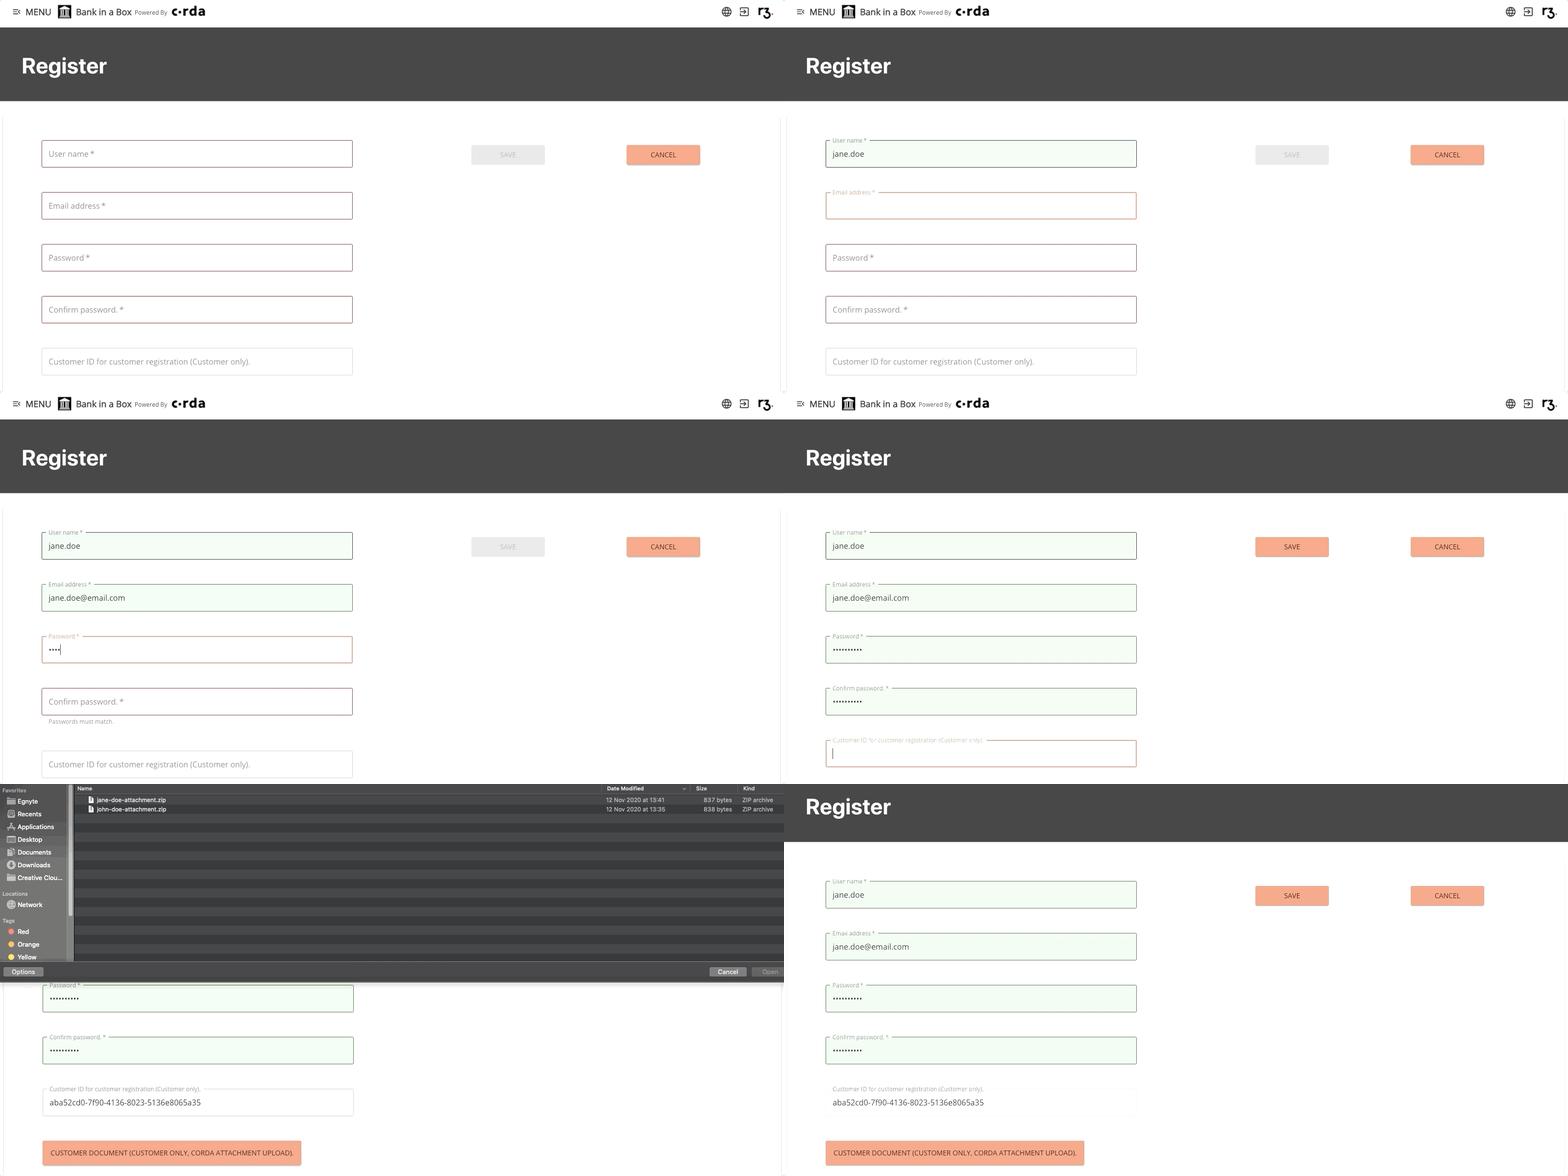
Register as a user on Bank in a Box

You must be registered as a Customer or Admin on Bank in a Box to perform tasks. Follow these steps to register:
From the Home page, click the Menu and select Register.
Enter your desired user name.
If the user name that you enter is already taken, you will receive an error message and must enter a different user name.Enter your email address.
Enter a password.
Click Save. A message will appear indicating that you have registered successfully.
Update customer profile

As an Admin user, you can update customer profiles. You can also view existing attachments or add new attachments. These attachments mimic a user identity verification and application process.
Navigate to the Customers screen. Click on the name of the customer whose profile you wish to update.
Update fields as necessary.
The Save button will be enabled once new information has been added. Click Save.
You are taken back to the Customers screen. A message will appear indicating that the customer profile was updated successfully.
Set withdrawal and transfer limits

Daily withdrawal and transfer limits can be applied to accounts. These are defined as:
- Withdrawal daily limit - The maximum amount that can be withdrawn from an account daily.
- Transfer daily limit - The maximum amount that can be transferred from an account daily.
An Admin user can set an account’s Withdrawal daily limit or Transfer daily limit when they create an account, however this field is optional. If you wish to add or modify these limits later, follow these steps.
Enter an amount above zero in desired limit field (Withdrawal daily limit or Transfer daily limit). If “0” is entered or the field is left blank, the account will not have that limit applied.
Click Save when you’ve entered the desired limits. A message will appear indicating that the limits have been saved successfully.
Customer tasks

Create an intrabank payment

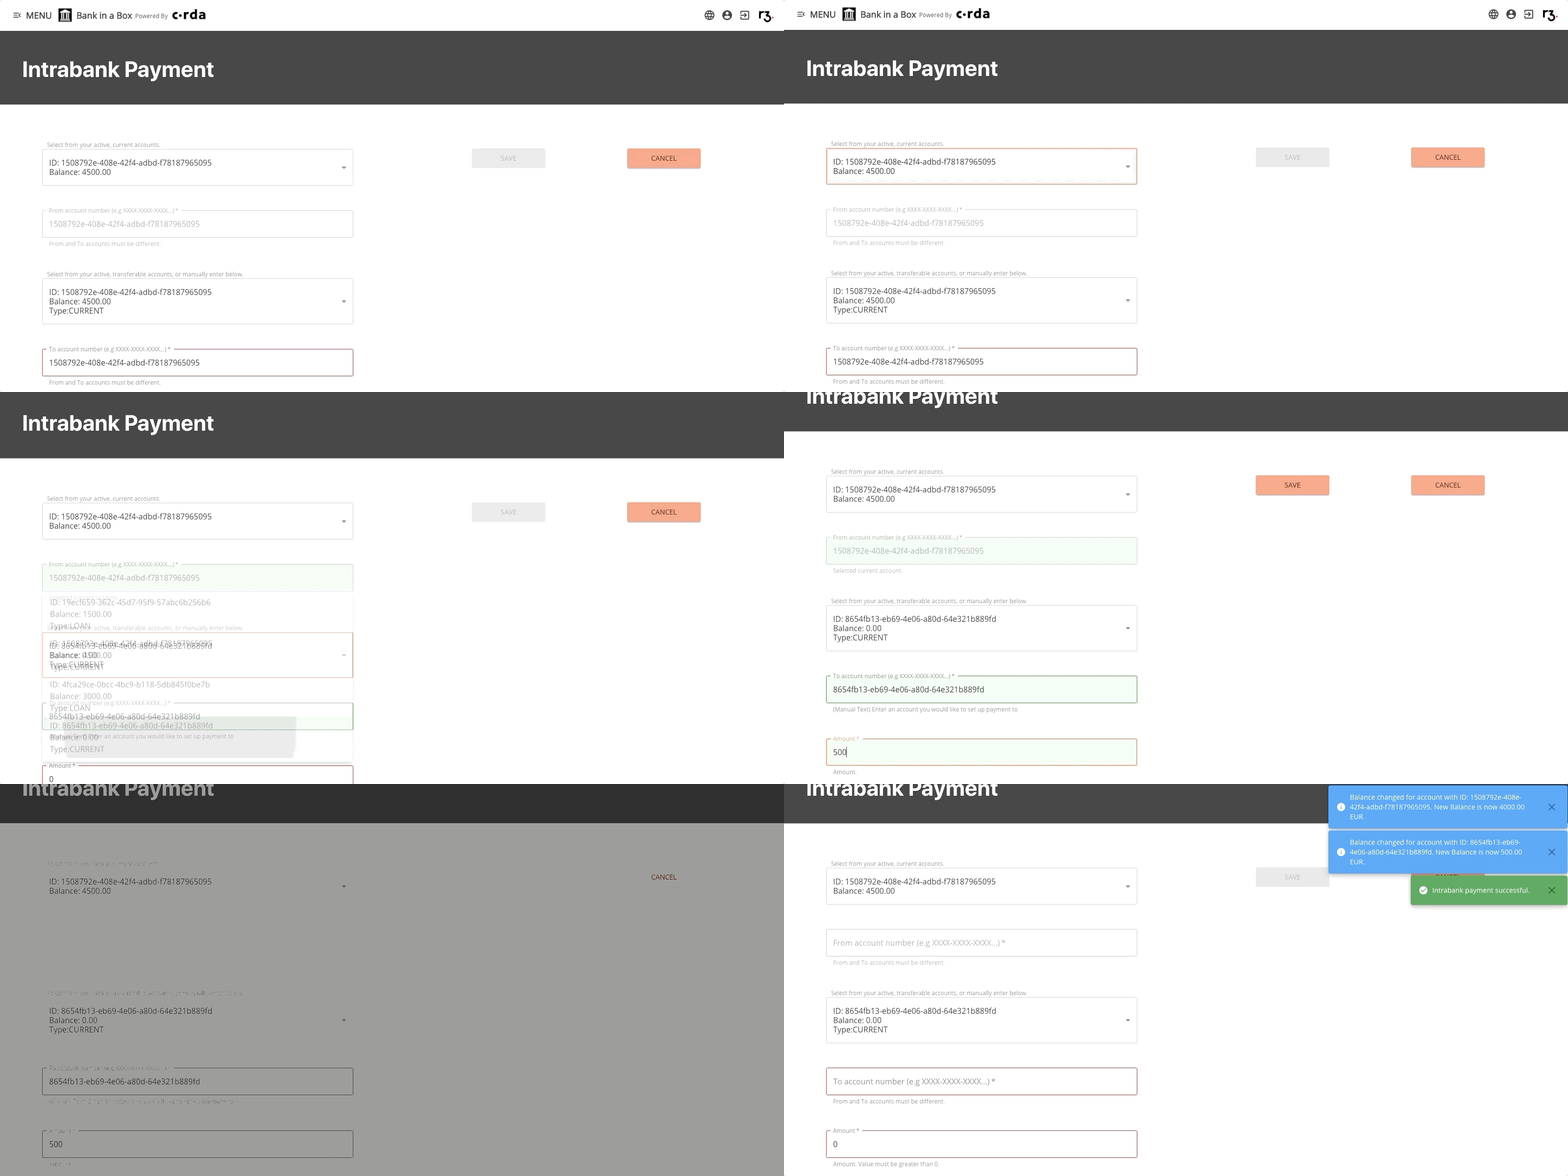
Follow these steps to create a new intrabank payment.
Go to the Intrabank payment screen.
You will only have access to this screen if you have at least one active current account.In the Account from field, enter your account ID.
In the Account to field, enter the account ID of the receiving account.
Enter the amount of money you wish to transfer.
Select the currency of the payment.
Click Save. You will receive a notification indicating that the payment was created successfully. You will also receive notifications indicating any changes in your account balances.
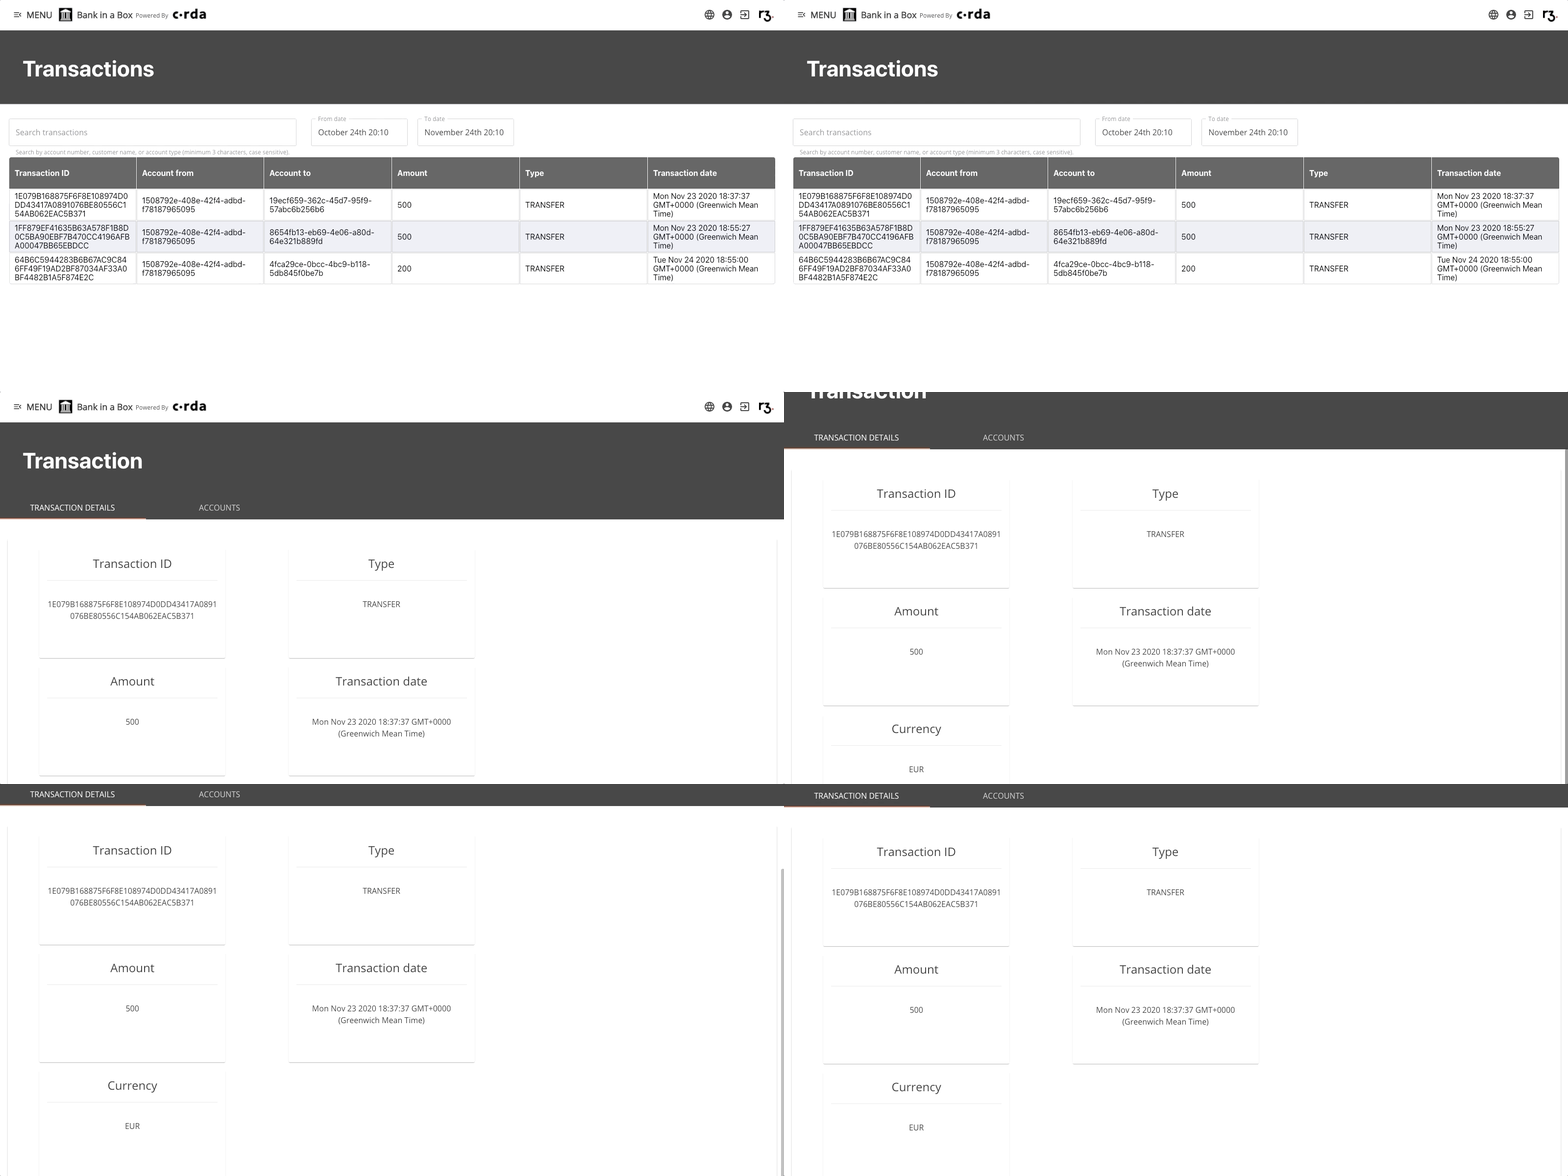
After making a payment, you can view the details of this transaction on the Transactions screen.
Create a recurring payment

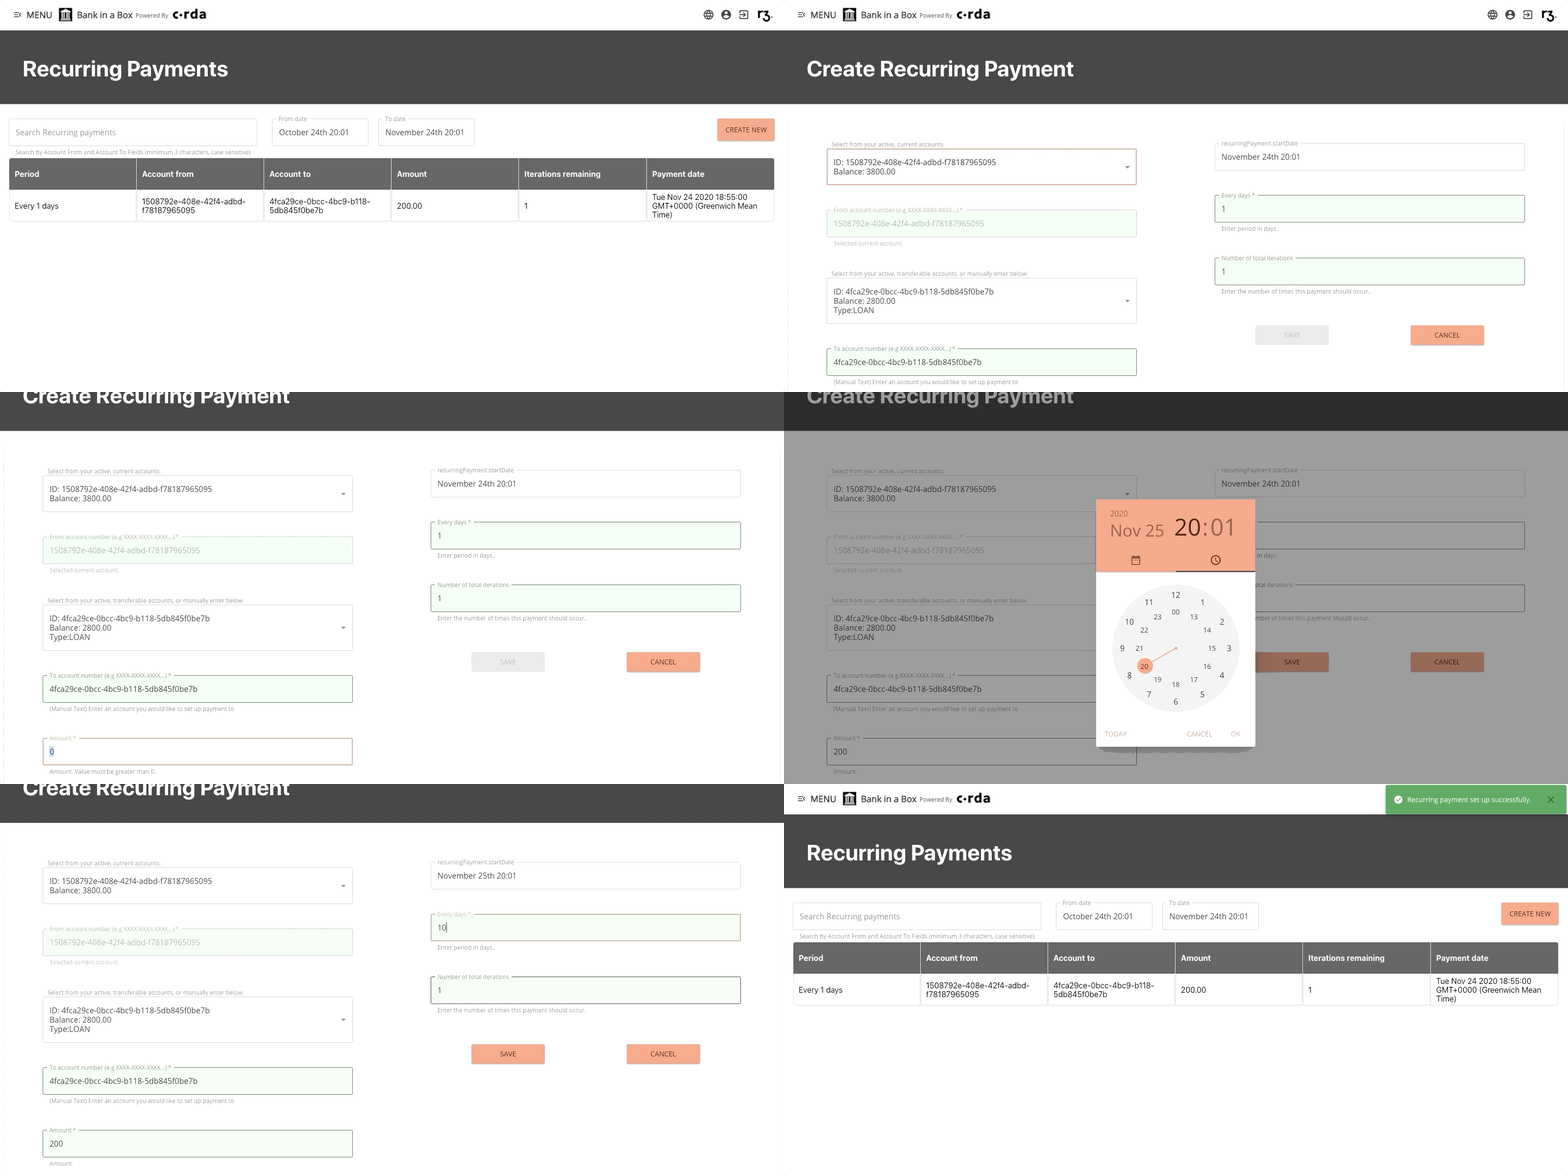
Follow these steps to create a recurring payment:
Go to the Recurring payments screen. Click the Create New button.
You will only have access to this screen if you have at least one active current account.Fill out all fields:
- Account from - the ID of the account that sent the money.
- Account to - the ID of the account that received the money.
- Amount - the amount of money to be sent.
- Start date - the date the recurring payment will begin.
- Number of iterations - the number of payments that will occur.
Once you have completed the required fields, the Save button will be enabled. Click Save.
You will be taken back to the Recurring payments screen where you will receive a message indicating that the recurring payment was created successfully.
Register as a user on Bank in a Box

You must be registered as a Customer or Admin on Bank in a Box to perform tasks. Follow these steps to register:
From the Home page, click the Menu and select Register.
Enter your desired user name.
If the user name that you enter is already taken, you will receive an error message and must enter a different user name.Enter your email address.
Enter a password.
Enter your Customer ID.
Upload the same customer document that the bank has associated to your account. This attachment mimics a user identity verification and application process.
Click Save. A message will appear indicating that you have registered successfully.

Update a customer profile

Update your customer profile by following these steps:
Navigate to the Update My Profile screen.
Update fields as necessary.
The Save button will be enabled once new information has been added. Click Save.
You are taken back to the Customers screen and a message will appear indicating that the customer was updated successfully.
Set withdrawal and transfer limits

Daily withdrawal and transfer limits can be applied to accounts. These are defined as:
- Withdrawal daily limit - The maximum amount that can be withdrawn from an account daily.
- Transfer daily limit - The maximum amount that can be transferred from an account daily.
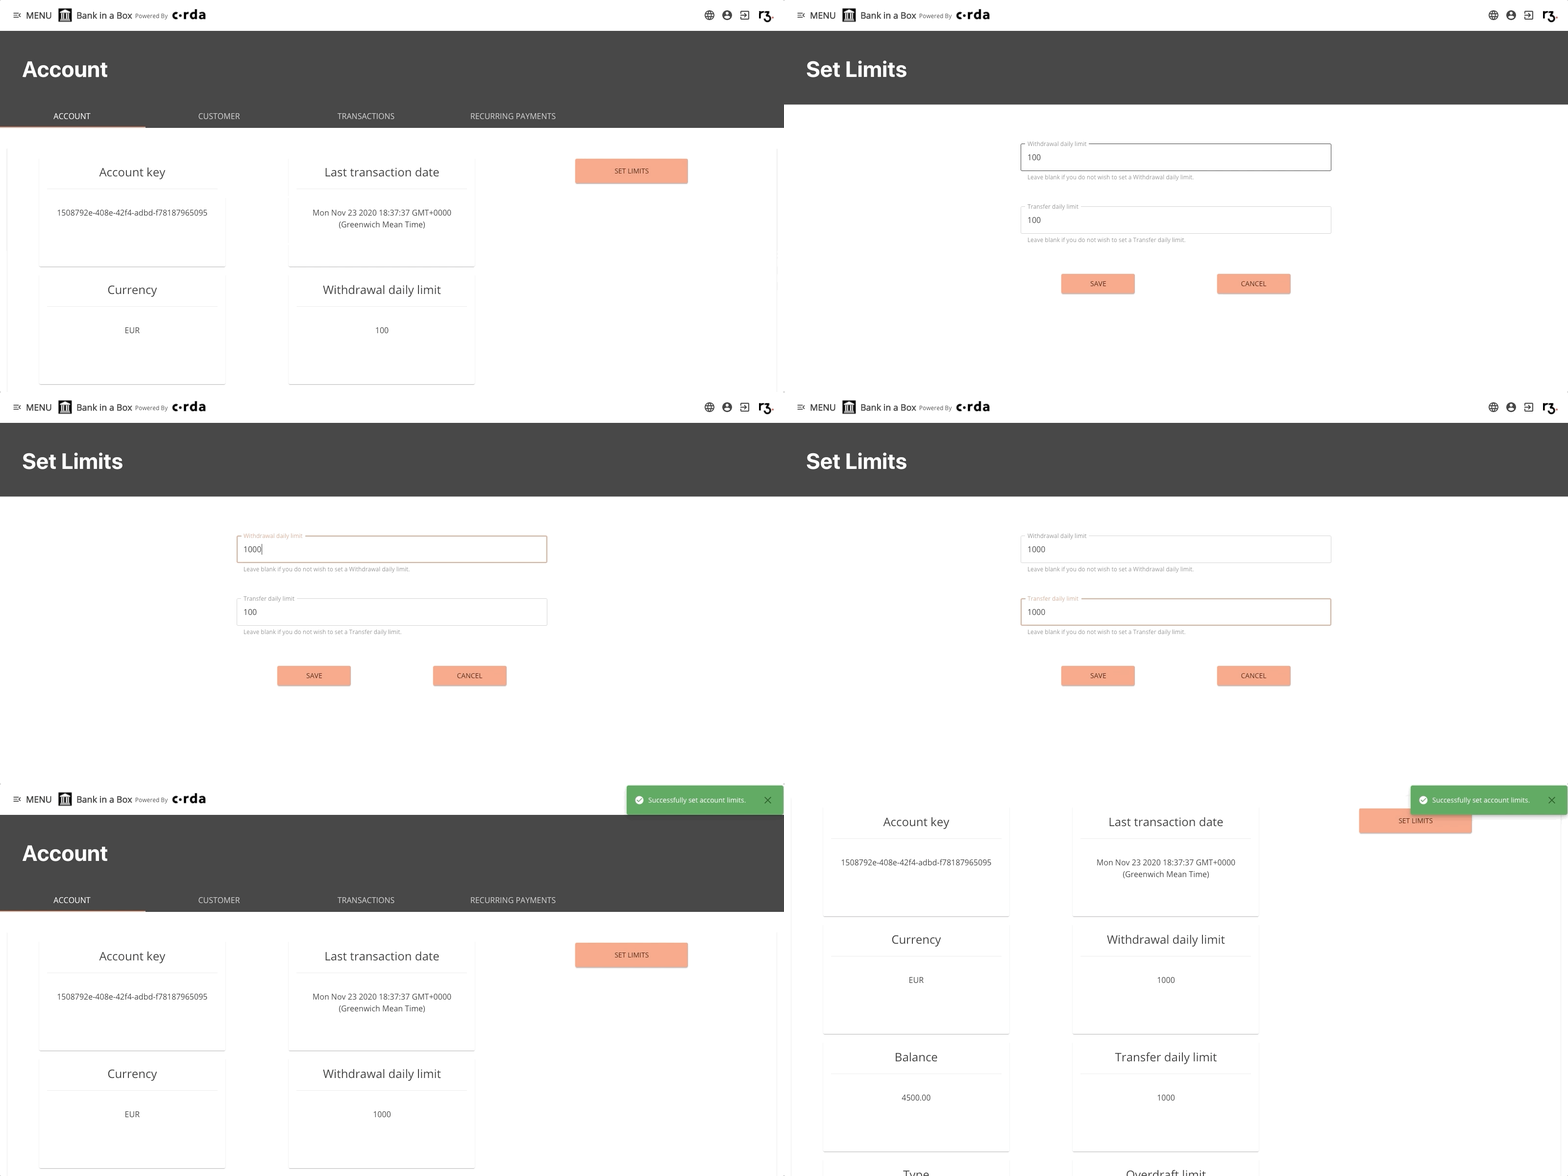
To set these limits as a Customer, follow these steps.
Go to the Account page.
Under the Account tab, click the Set Limits button in the upper right-hand corner of the page.
Enter the maximum amount you wish to be able to withdraw on a given day.
Enter the maximum amount you wish to be able to transfer on a given day.
Click Save. You will be taken back to the Account page where you will receive a message indicating that the limits have been updated successfully.
Was this page helpful?
Thanks for your feedback!
Chat with us
Chat with us on our #docs channel on slack. You can also join a lot of other slack channels there and have access to 1-on-1 communication with members of the R3 team and the online community.
Propose documentation improvements directly
Help us to improve the docs by contributing directly. It's simple - just fork this repository and raise a PR of your own - R3's Technical Writers will review it and apply the relevant suggestions.
We're sorry this page wasn't helpful. Let us know how we can make it better!
Chat with us
Chat with us on our #docs channel on slack. You can also join a lot of other slack channels there and have access to 1-on-1 communication with members of the R3 team and the online community.
Create an issue
Create a new GitHub issue in this repository - submit technical feedback, draw attention to a potential documentation bug, or share ideas for improvement and general feedback.
Propose documentation improvements directly
Help us to improve the docs by contributing directly. It's simple - just fork this repository and raise a PR of your own - R3's Technical Writers will review it and apply the relevant suggestions.